CentOS6.4ϵ�y(t��ng)��Mysql��(sh��)��(j��)��(k��)ж�d�����b�c����_MySQL�̳�
���]��mysql��binlog̫��̫��ռ�ô����űP(p��n)�Ľ�Q�F(xi��n)�W(w��ng)վ�L��(w��n)Խ��(l��i)Խ�������o(w��)���L��(w��n)�ˣ���(j��ng)�^(gu��)�z��l(f��)�F(xi��n)�űP(p��n)�M(m��n)�ˡ��м�(x��)��ԃ(x��n)��(l��i)�_�J(r��n)������mysql��binlog̫��̫��ռ���˿��g�� �����^(gu��)�̼���Q������ͨ�����F(xi��n)�@�N��(w��n)�}����(y��ng)ԓ��䛷���(w��)���z��űP(p��n)����(n��i)����M(j��n)��ʹ�õ���r��ͨ�^(gu��)top��df h��free m��(l��i)�z�飬�l(f��)�F(xi��n)�űP(p��n)���g�M(m��n)�ˡ�
��������Windows server 2003,2008��һ�㰲�b����Sql Server ��(sh��)��(j��)��(k��)����linuxϵ�y(t��ng)��һ�㰲�b����mysql��(sh��)��(j��)��(k��)������Mysql��(sh��)��(j��)��(k��)�ĵ�һ��(g��)�汾���ǰl(f��)����Linuxϵ�y(t��ng)�ϵġ�
����һ��mysql��(ji��n)��
����MySQL��һ��(g��)�P(gu��n)ϵ�͔�(sh��)��(j��)��(k��)����ϵ�y(t��ng)�������MySQL AB��˾�_(k��i)�l(f��)��Ŀǰ����Oracle��˾��MySQL��һ�N�P(gu��n)(li��n)��(sh��)��(j��)��(k��)����ϵ�y(t��ng)���P(gu��n)(li��n)��(sh��)��(j��)��(k��)����(sh��)��(j��)�����ڲ�ͬ�ı��У������nj����Д�(sh��)��(j��)����һ��(g��)��}(c��ng)��(k��)��(n��i)���@�Ӿ��������ٶȲ�������`���ԡ�MySQL��SQL�Z(y��)���������L��(w��n)��(sh��)��(j��)��(k��)����Ø�(bi��o)��(zh��n)���Z(y��)�ԡ�MySQLܛ���������p�ڙ�(qu��n)����(���~�l“�ڙ�(qu��n)����”)�����֞���^(q��)����̘I(y��)�棬�������w�eС���ٶȿ졢���w���гɱ��ͣ��������_(k��i)��Դ�a�@һ���c(di��n)��һ����С�;W(w��ng)վ���_(k��i)�l(f��)���x��MySQL����W(w��ng)վ��(sh��)��(j��)��(k��)����������^(q��)�������Խ������PHP��Apache�ɽM�����õ��_(k��i)�l(f��)�h(hu��n)����
������Linux�ϰ��bmysql��(sh��)��(j��)��(k��)���҂�����ȥ��پW(w��ng)�����dmysql��(sh��)��(j��)��(k��)��rpm����http://dev.mysql.com/downloads/mysql/5.6.html#downloads����ҿ��Ը���(j��)�Լ��IJ���ϵ�y(t��ng)ȥ���d��(du��)��(y��ng)�Ĕ�(sh��)��(j��)��(k��)�ļ���Ŀǰ���µİ汾��5.6.10�ˡ�
�������@������ͨ�^(gu��)yum��(l��i)�M(j��n)��mysql��(sh��)��(j��)��(k��)�İ��b�ģ�ͨ�^(gu��)�@�N��ʽ�M(j��n)�а��b�����Ԍ���mysql���P(gu��n)��һЩ����(w��)��jar�����o�҂����b�ã�����ʡȥ�˺ܶ��Ҫ���韩!!!
��������ж�d��ԭ��mysql
������?y��n)�mysql��(sh��)��(j��)��(k��)��Linux�ό�(sh��)����̫�����ˣ�����Ŀǰ���d������Linuxϵ�y(t��ng)�汾�����϶�������mysql��(sh��)��(j��)��(k��)�����棬�҂�����ͨ�^(gu��)���������(l��i)�鿴�҂��IJ���ϵ�y(t��ng)���Ƿ��ѽ�(j��ng)���b��mysql��(sh��)��(j��)��(k��)
����[root@xiaoluo ~]# rpm -qa | grep mysql����// �@��(g��)����͕�(hu��)�鿴ԓ����ϵ�y(t��ng)���Ƿ��ѽ�(j��ng)���b��mysql��(sh��)��(j��)��(k��)
�����е�Ԓ���҂���ͨ�^(gu��) rpm -e ���� ���� rpm -e --nodeps �����(l��i)ж�d��
����[root@xiaoluo ~]# rpm -e mysql����// ��ͨ�h��ģʽ
����[root@xiaoluo ~]# rpm -e --nodeps mysql����// ��(qi��ng)���h��ģʽ�����ʹ����������h���r(sh��)����ʾ����ه(l��i)�������ļ����t��ԓ������Ԍ�(du��)���M(j��n)�Џ�(qi��ng)���h��
�����ڄh�����Ժ��҂�����ͨ�^(gu��) rpm -qa | grep mysql �����(l��i)�鿴mysql�Ƿ��ѽ�(j��ng)ж�d�ɹ�!!
��������ͨ�^(gu��)yum��(l��i)�M(j��n)��mysql�İ��b
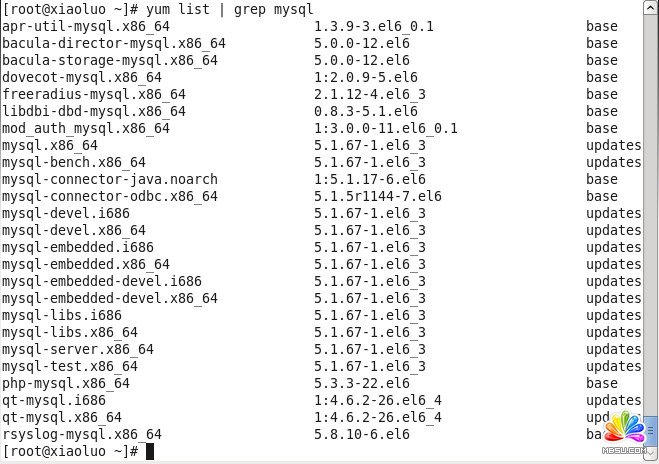
��������ͨ�^(gu��)yum�ķ�ʽ��(l��i)�M(j��n)��mysql�Ĕ�(sh��)��(j��)��(k��)���b�������҂�����ݔ�� yum list | grep mysql �����(l��i)�鿴yum���ṩ��mysql��(sh��)��(j��)��(k��)�����d�İ汾��
����[root@xiaoluo ~]# yum list | grep mysql
�����Ϳ��Եõ�y(t��ng)um����(w��)����mysql��(sh��)��(j��)��(k��)�Ŀ����d�汾��Ϣ��
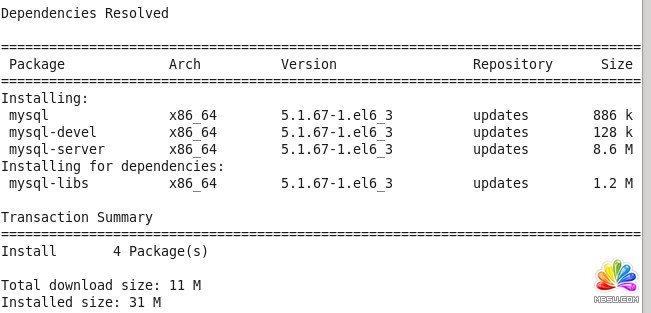
����Ȼ���҂�����ͨ�^(gu��)ݔ�� yum install -y mysql-server mysql mysql-devel ���mysql mysql-server mysql-devel�����b��(ע��:���bmysql�r(sh��)�҂������ǰ��b��mysql�͑�(h��)�˾��ஔ(d��ng)�ڰ��b����mysql��(sh��)��(j��)��(k��)�ˣ��҂�߀��Ҫ���bmysql-server����(w��)�˲���)
����[root@xiaoluo ~]# yum install -y mysql-server mysql mysql-deve
�����ڵȴ���һ���r(sh��)�g��yum��(hu��)���҂��x��ð��bmysql��(sh��)��(j��)��(k��)����Ҫ��ܛ���Լ��������ٵ�һЩܛ��
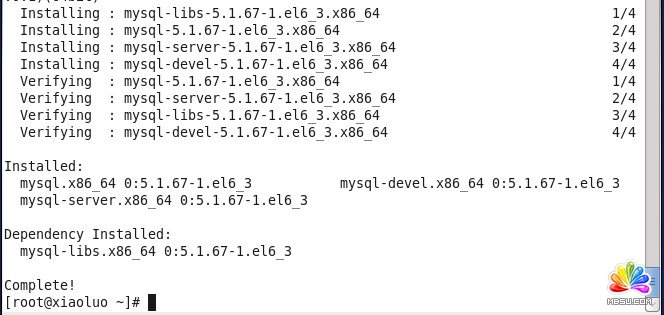
�����҂��l(f��)�F(xi��n)��ͨ�^(gu��)yum��ʽ���bmysql��(sh��)��(j��)��(k��)ʡȥ�˺ܶ��](m��i)��Ҫ���韩����(d��ng)���F(xi��n)����ĽY(ji��)���r(sh��)���ʹ���mysql��(sh��)��(j��)��(k��)���b�ɹ���
�����˕r(sh��)�҂�����ͨ�^(gu��)��������鿴�����b�õ�mysql-server�İ汾
����[root@xiaoluo ~]# rpm -qi mysql-server
�����҂����b��mysql-server���������°汾���������Lԇ���°汾���Ǿ�ȥmysql�پW(w��ng)���drpm�����b�����ˣ������҂���mysql��(sh��)��(j��)��(k��)�ѽ�(j��ng)���b����ˡ�
�����ġ�mysql��(sh��)��(j��)��(k��)�ij�ʼ�������P(gu��n)����
�����҂�?c��)ڰ��b��mysql��(sh��)��(j��)��(k��)�Ժ�(hu��)�l(f��)�F(xi��n)��(hu��)���һ��(g��)mysqld�ķ���(w��)���@��(g��)�����ۂ��Ĕ�(sh��)��(j��)��(k��)����(w��)���҂�ͨ�^(gu��)ݔ�� service mysqld start ����Ϳ��Ԇ���(d��ng)�҂���mysql����(w��)��
����ע�⣺����҂��ǵ�һ�Ά���(d��ng)mysql����(w��)��mysql����(w��)�����ȕ�(hu��)�M(j��n)�г�ʼ�������ã��磺
����[root@xiaoluo ~]# service mysqld start
������ʼ�� MySQL ��(sh��)��(j��)��(k��)�� WARNING: The host 'xiaoluo' could not be looked up with resolveip.
����This probably means that your libc libraries are not 100 % compatible
����with this binary MySQL version. The MySQL daemon, mysqld, should work
����normally with the exception that host name resolving will not work.
����This means that you should use IP addresses instead of hostnames
����when specifying MySQL privileges !
����Installing MySQL system tables...
����OK
����Filling help tables...
����OK
����To start mysqld at boot time you have to copy
����support-files/mysql.server to the right place for your system
����PLEASE REMEMBER TO SET A PASSWORD FOR THE MySQL root USER !
����To do so, start the server, then issue the following commands:
����/usr/bin/mysqladmin -u root password 'new-password'
����/usr/bin/mysqladmin -u root -h xiaoluo password 'new-password'
����Alternatively you can run:
����/usr/bin/mysql_secure_installation
����which will also give you the option of removing the test
����databases and anonymous user created by default. This is
����strongly recommended for production servers.
����See the manual for more instructions.
����You can start the MySQL daemon with:
����cd /usr ; /usr/bin/mysqld_safe &
����You can test the MySQL daemon with mysql-test-run.pl
����cd /usr/mysql-test ; perl mysql-test-run.pl
����Please report any problems with the /usr/bin/mysqlbug script!
����[�_��]
�������چ���(d��ng) mysqld�� [�_��]
�����@�r(sh��)�҂���(hu��)������һ�Ά���(d��ng)mysql����(w��)���Ժ��(hu��)��ʾ�dz������Ϣ��Ŀ�ľ��nj�(du��)mysql��(sh��)��(j��)��(k��)�M(j��n)�г�ʼ����������(d��ng)�҂�?c��)ٴ������?d��ng)mysql����(w��)�r(sh��)���Ͳ���(hu��)��ʾ�@ô����Ϣ�ˣ��磺
����[root@xiaoluo ~]# service mysqld restart
����ֹͣ mysqld�� [�_��]
�������چ���(d��ng) mysqld�� [�_��]
�����҂�?c��)�ʹ��mysql��(sh��)��(j��)��(k��)�r(sh��)���������Ȇ���(d��ng)mysqld����(w��)���҂����� ͨ�^(gu��) chkconfig --list | grep mysqld �����(l��i)�鿴mysql����(w��)�Dz����_(k��i)�C(j��)�Ԅ�(d��ng)����(d��ng)���磺
����[root@xiaoluo ~]# chkconfig --list | grep mysqld
����mysqld 0:�P(gu��n)�] 1:�P(gu��n)�] 2:�P(gu��n)�] 3:�P(gu��n)�] 4:�P(gu��n)�] 5:�P(gu��n)�] 6:�P(gu��n)�]
�����҂��l(f��)�F(xi��n)mysqld����(w��)���](m��i)���_(k��i)�C(j��)�Ԅ�(d��ng)����(d��ng)���҂���(d��ng)Ȼ����ͨ�^(gu��) chkconfig mysqld on �����(l��i)�����O(sh��)�ó��_(k��i)�C(j��)����(d��ng)���@�ӾͲ���ÿ�ζ�ȥ�ք�(d��ng)����(d��ng)��
����[root@xiaoluo ~]# chkconfig mysqld on
����[root@xiaoluo ~]# chkconfig --list | grep mysql
����mysqld 0:�P(gu��n)�] 1:�P(gu��n)�] 2:���� 3:���� 4:���� 5:���� 6:�P(gu��n)�]
����mysql��(sh��)��(j��)��(k��)���b���Ժ�ֻ��(hu��)��һ��(g��)root����T�~̖(h��o)�����Ǵ˕r(sh��)��root�~̖(h��o)߀���](m��i)�О����O(sh��)���ܴa���ڵ�һ�Ά���(d��ng)mysql����(w��)�r(sh��)����(hu��)�M(j��n)�Д�(sh��)��(j��)��(k��)��һЩ��ʼ����������ݔ����һ����Ϣ�У��҂��������@��һ����Ϣ ��
����/usr/bin/mysqladmin -u root password 'new-password'����// ��root�~̖(h��o)�O(sh��)���ܴa
���������҂�����ͨ�^(gu��) ԓ�����(l��i)�o�҂���root�~̖(h��o)�O(sh��)���ܴa(ע�⣺�@��(g��)root�~̖(h��o)��mysql��root�~̖(h��o)����Linux��root�~̖(h��o))
����[root@xiaoluo ~]# mysqladmin -u root password 'root'����// ͨ�^(gu��)ԓ����oroot�~̖(h��o)�O(sh��)���ܴa�� root
�����˕r(sh��)�҂��Ϳ���ͨ�^(gu��) mysql -u root -p �����(l��i)����҂���mysql��(sh��)��(j��)��(k��)��

�����塢mysql��(sh��)��(j��)��(k��)����Ҫ�����ļ�
����1./etc/my.cnf �@��mysql���������ļ�
�����҂����Բ鿴һ���@��(g��)�ļ���һЩ��Ϣ
����[root@xiaoluo etc]# ls my.cnf
����my.cnf
����[root@xiaoluo etc]# cat my.cnf
����[mysqld]
����datadir=/var/lib/mysql
����socket=/var/lib/mysql/mysql.sock
����user=mysql
����# Disabling symbolic-links is recommended to prevent assorted security risks
����symbolic-links=0
����[mysqld_safe]
����log-error=/var/log/mysqld.log
����pid-file=/var/run/mysqld/mysqld.pid
����2./ver/lib/mysql mysql��(sh��)��(j��)��(k��)�Ĕ�(sh��)��(j��)��(k��)�ļ����λ��
�����҂���mysql��(sh��)��(j��)��(k��)�Ĕ�(sh��)��(j��)��(k��)�ļ�ͨ���Ǵ������/ver/lib/mysql�@��(g��)Ŀ���
����[root@xiaoluo ~]# cd /var/lib/mysql/
����[root@xiaoluo mysql]# ls -l
���������� 20488
����-rw-rw----. 1 mysql mysql 10485760 4�� 6 22:01 ibdata1
����-rw-rw----. 1 mysql mysql 5242880 4�� 6 22:01 ib_logfile0
����-rw-rw----. 1 mysql mysql 5242880 4�� 6 21:59 ib_logfile1
����drwx------. 2 mysql mysql 4096 4�� 6 21:59 mysql����// �@�ɂ�(g��)��mysql��(sh��)��(j��)��(k��)���b�r(sh��)Ĭ�J(r��n)�ăɂ�(g��)��(sh��)��(j��)��(k��)�ļ�
����srwxrwxrwx. 1 mysql mysql 0 4�� 6 22:01 mysql.sock
����drwx------. 2 mysql mysql 4096 4�� 6 21:59 test����// �@�ɂ�(g��)��mysql��(sh��)��(j��)��(k��)���b�r(sh��)Ĭ�J(r��n)�ăɂ�(g��)��(sh��)��(j��)��(k��)�ļ�
�����҂������Լ���(chu��ng)��һ��(g��)��(sh��)��(j��)��(k��)����(l��i)�(y��n)�Cһ��ԓ��(sh��)��(j��)��(k��)�ļ��Ĵ��λ��
������(chu��ng)��һ��(g��)�҂��Լ��Ĕ�(sh��)��(j��)��(k��)��
����mysql> create database xiaoluo;
����Query OK, 1 row affected (0.00 sec)
����[root@xiaoluo mysql]# ls -l
���������� 20492
����-rw-rw----. 1 mysql mysql 10485760 4�� 6 22:01 ibdata1
����-rw-rw----. 1 mysql mysql 5242880 4�� 6 22:01 ib_logfile0
����-rw-rw----. 1 mysql mysql 5242880 4�� 6 21:59 ib_logfile1
����drwx------. 2 mysql mysql 4096 4�� 6 21:59 mysql
����srwxrwxrwx. 1 mysql mysql 0 4�� 6 22:01 mysql.sock
����drwx------. 2 mysql mysql 4096 4�� 6 21:59 test
����drwx------. 2 mysql mysql 4096 4�� 6 22:15 xiaoluo����// �@��(g��)�����҂����Լ���(chu��ng)����xiaoluo��(sh��)��(j��)��(k��)
����[root@xiaoluo mysql]# cd xiaoluo/
����[root@xiaoluo xiaoluo]# ls
����db.opt
����3./var/log mysql��(sh��)��(j��)��(k��)����־ݔ�����λ��
�����҂���mysql��(sh��)��(j��)��(k��)��һЩ��־ݔ�����λ�ö�����/var/log�@��(g��)Ŀ���
����[root@xiaoluo xiaoluo]# cd
����[root@xiaoluo ~]# cd /var/log
����[root@xiaoluo log]# ls
����amanda cron maillog-20130331 spice-vdagent.log
����anaconda.ifcfg.log cron-20130331 mcelog spooler
����anaconda.log cups messages spooler-20130331
����anaconda.program.log dirsrv messages-20130331 sssd
����anaconda.storage.log dmesg mysqld.log tallylog
����anaconda.syslog dmesg.old ntpstats tomcat6
����anaconda.xlog dracut.log piranha wpa_supplicant.log
����anaconda.yum.log gdm pm-powersave.log wtmp
����audit httpd ppp Xorg.0.log
����boot.log ibacm.log prelink Xorg.0.log.old
����btmp lastlog sa Xorg.1.log
����btmp-20130401 libvirt samba Xorg.2.log
����cluster luci secure Xorg.9.log
����ConsoleKit maillog secure-20130331 yum.log
��������mysqld.log �@��(g��)�ļ������҂�����҂���mysql��(sh��)��(j��)��(k��)�M(j��n)�в������a(ch��n)����һЩ��־��Ϣ��ͨ�^(gu��)�鿴ԓ��־�ļ����҂����ԏ��Ы@�úܶ���Ϣ
������SQL Server Management Studio �](m��i)�г���(l��i)һ�N��r���ڰ��b sqlServer2005 �r(sh��) ��Ȼ���F(xi��n)�ɂ�(g��)���棺 1 Com+ Ŀ�Ҫ�� 2 Edition change check ����!�W(w��ng)���f(shu��)���F(xi��n)�ɂ�(g��)���棬�ǿ϶��b���ɹ���!�ұ����e�ҵđB(t��i)��ԇ���£��ɹ��ˡ� ���b�ɹ�������(zh��n)�� �H���ߡ�(li��n)�C(j��)����(sh��)��ʾ��(T) ���ǰ��b���ˣ�����ʾ�ҹ���վ�M�����b
- MSSQL�����־�h����־�ļ�
- �P(gu��n)�ڔ�(sh��)��(j��)��(k��)�б���С��(sh��)λ�Ć�(w��n)�}
- ����mysql�cOracle update�ą^(q��)�e
- mysql ��(d��o)�댧(d��o)����(sh��)��(j��)��(k��)�Լ�����(sh��)���惦(ch��)�^(gu��)�̵Ľ�B
- MySQL������root�ܴa��4�N����(��windows����)
- ��QMYSQL���F(xi��n)Can''t create/write to file ''#sql_5c0_0.MYD''��(w��n)�}
- ��������SQL���ķN�B��-�����B�ӡ������B�ӡ���(n��i)�B�ӡ�ȫ�B��
- ����:��(n��i)(li��n),����(li��n),����(li��n),ȫ�B��,�����B�ӵą^(q��)�e
- mysql���F(xi��n)��Incorrect key file for table��̎������
- mysql���b����F(xi��n)�y�a�O(sh��)�Þ�utf8�ɽ�Q
- �\��һ��(g��)MYSQL�Z(y��)��(�ڲ�ԃ(x��n)��ʹ��count)�ļ����Ԇ�(w��n)�}
- ����MySQL��INSERT INTO SELECT��ʹ��
MySQL�̳�Rssӆ����̳̽�����
MySQL�̳����]
- Mysql���āy�a�Լ���(d��o)����sql�Z(y��)���Excel��(w��n)�}��Q����[�D��]
- Mysql�鿴�汾̖(h��o)����N��ʽ��B
- sql�Z(y��)��:SQLServer�ֶ�����(���P��(hu��),ƴ��,ƴ������ĸ)
- MySQL�����в���0ֵ�Ľ�Q����
- MySQLǰ�Y������(d��o)�µ�����ԃ(x��n)�������Y(ji��)
- SQL�Z(y��)����Q�ֶ��еēQ�з�����܇(ch��)��
- SQL�ַ����ֶΰ���(sh��)�����ֶ�����?q��)��F(xi��n)����
- ����MYSQL�Ѓ�(y��u)����һЩ����
- mysql��(d��o)����(sh��)��(j��)��(k��)�N����
- mysql ����ֵ�D(zhu��n)׃?y��u)��еķ��?/a>
����Ҳϲ�g���@Щ
- ���xSQLServer2005 XML��T��SQL�еđ�(y��ng)��
- ��(sh��)��(j��)�(l��i)�͵ı��_(d��)ʽ�D(zhu��n)�Q����һ�N��(sh��)��(j��)�(l��i)��
- �h��SQL Server��־�ķ���
- ��ν�QDB2�г��F(xi��n)��SQL1032N�e(cu��)�`�F(xi��n)��
- sql server �кϲ�ij��(g��)�ֶ�ֵ�Č�(sh��)��
- ܛ���C��(sh��)���µ��P(gu��n)�ISQL Server©��
- ��SQL Server��(sh��)��(j��)��(k��)��������(d��o)�딵(sh��)��(j��)���ķN����
- ��SQL Server��ͨ�^(gu��).NET�h(yu��n)�̵Ĉ�(zh��)��SQL�ļ�
- ���x��SQL Server��̎����ֵ�r(sh��)�漰������(g��)��(w��n)�}
- SQL2005 ���ܱO(ji��n)ҕ��Ӌ(j��)��(sh��)���e(cu��)�`��Q����
- ���P(gu��n)朽ӣ�
��(f��)�Ʊ��(y��)朽�| ����CentOS6.4ϵ�y(t��ng)��Mysql��(sh��)��(j��)��(k��)ж�d�����b�c����
- �̳��f(shu��)����
MySQL�̳�-CentOS6.4ϵ�y(t��ng)��Mysql��(sh��)��(j��)��(k��)ж�d�����b�c����
 ��
��